Tutorial: How to Digitize LPs.
This tutorial explains how to convert your record albums into digital audio. We’ll go through the equipment you'll need, how to set up your computer and turntable to record, and how to split up tracks and add metadata.
Step 1: The proper equipment.
- A Mac computer with built-in microphone and speakers and line-in input
- Amplified turntable and the proper cables to connect to your computer
- Collection of LPs that you want to digitize
- Sound Studio 4 (we use version 4.2 in this tutorial)
Depending on how many albums you want to digitize, make sure you have a fair amount of disk space on your computer to edit and save recordings. If you’re planning on archiving your music and/or you have a lot of albums to digitize, consider using an external hard drive.
Traditional turntables are unamplified, which means that they’re below line level and need an extra stage of amplification to boost them up to the volume of current audio sources. You’ll need a phono pre-amplifier to amplify your audio output and to correct the RIAA curve (more information about the RIAA curve is below). You’ll probably need an RCA to ⅛-inch stereo cable to connect your amplifier to your computer, but check what cables come with your amplifier first and check your connections to be sure.
If you have a USB turntable, RIAA adjustment and amplification are likely built into the turntable, so you don’t need to worry about getting an amplifier.
Make sure you have clean LPs free of dust and static electrical charge, which could create unwanted noise and affect the sound of your audio output.
About the RIAA curve and how it affects audio output. Most records were created with low frequencies reduced and high frequencies boosted so that when they’re played back on turntables the opposite would happen, enhancing the sound. Records cut after 1954 for the most part use this standard RIAA curve. The RIAA curve is important because when you’re importing audio directly from a turntable, you’ll need to make sure the RIAA curve is corrected. More modern, amplified turntables (USB turntables, for example) likely have built-in RIAA adjustment. Older, unamplified turntables will need a phono pre-amplifier to automatically adjust RIAA and to boost the line level to the correct volume.
Step 2: Set up and record your LPs.
With the right setup, you can achieve a clean, high quality audio recording. Check the condition of your cartridge and needle and consider whether your turntable might also need lubrication or alignment adjustments. If your turntable is in good condition, you’ll avoid adding unwanted noise or distortion from a bad needle or misalignment.
Setting up your computer and turntable.
Connect your turntable to your computer. If you have a phono pre-amp, you’ll be connecting your turntable to the pre-amp and then connecting the pre-amp to your computer, probably with an RCA cable.
Launch Sound Studio, go to Sound Studio > Preferences. For Input, you should select either Built-in Input (for an amplified turntable connected to your line-in input) or the name of your USB turntable. For Output, choose Built-in Output. Then, check “Playthrough in to out” so that you can hear the audio from your input through your speakers.

Start playing the record until sound comes out of your speakers. If you don’t hear anything, check your connections. Adjust the input levels in the bottom left-hand corner of the window so that level meters go occasionally to yellow, but not red. Going into the red will result in distortion in the recording.

Building a logical workflow.
Before you start recording, think about what tasks you need to do to build a logical and efficient workflow. If you’re planning to digitize several LPs, a good workflow will make the process go quicker and help ensure that you have consistent results. Draft a list of tasks and then try it out on an LP and take notes. Adjust your workflow so that it makes sense with what you’re doing.
- Record/capture audio.
- Split up tracks and add metadata.
- Save in the appropriate file format(s).
Capturing audio in Sound Studio.
When you’re ready to record, hit the record button in Sound Studio and then start playing your LP. You should see the waveform filling up your Sound Studio window. Sit back and enjoy the music until you’re done recording, or set up a timer that will alert you to come back and check on the recording.
For more advanced users, you can also set up Sound Studio to automatically start and stop recording at certain points using the Auto Start/ Stop Recording feature under the Audio menu.
Step 3: Split up tracks and add metadata.
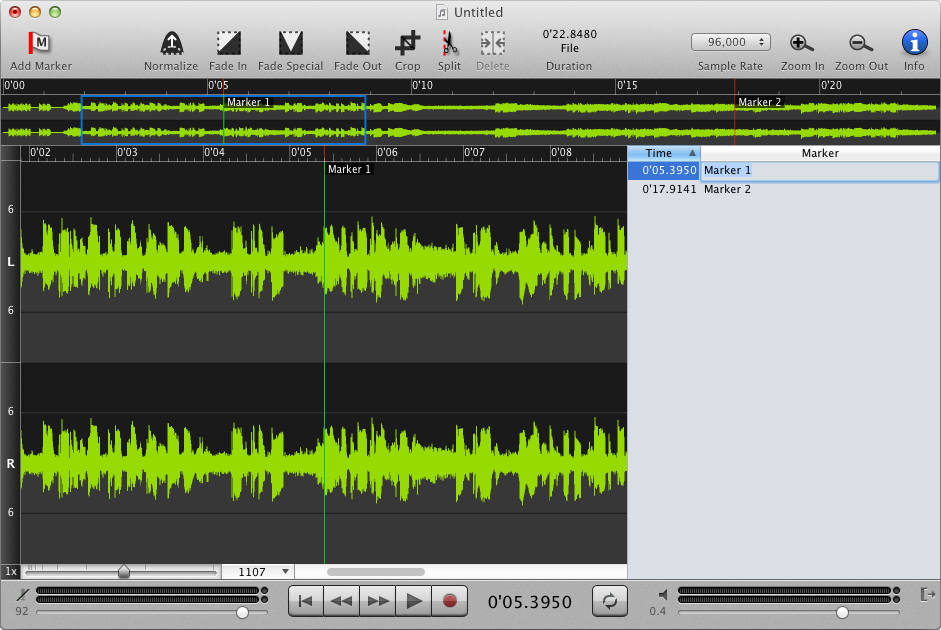
Sound Studio allows you to put placeholders called “markers” between each song or section of the recording that you want to make into a separate track. To mark where you want to split up tracks, click where the first track starts and then go to Insert > Marker. Continue to insert markers at the beginning of each new track.
There’s also a keyboard shortcut for inserting markers. Click where you want to place the marker and hit the “M” key. When you’re done, you can edit the marker labels (i.e., “Marker 1”) by double-clicking on them directly in the editing window or by going to the marker sidebar under View > Show Sidebar and double-clicking on each marker label.
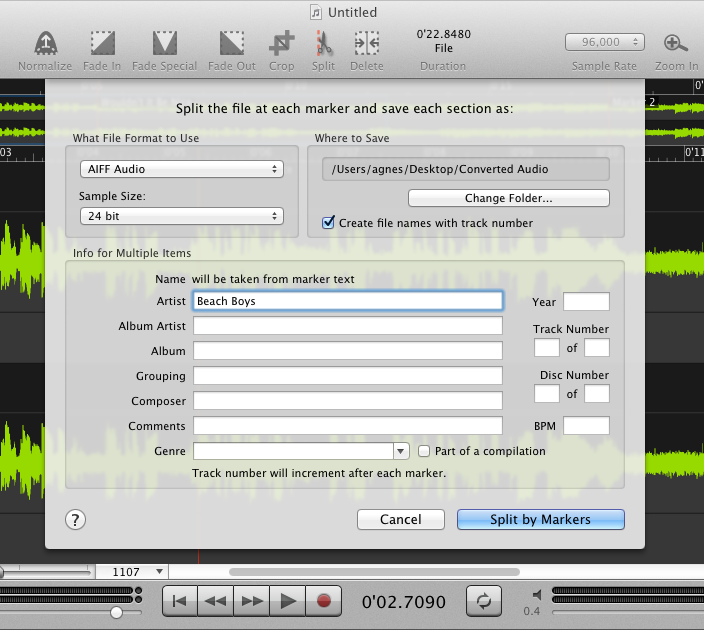
When you’re done inserting the markers, go to Edit > Split by Markers... to add your album metadata. Your marker labels will automatically be imported as the name of each track.
The Split by Markers command brings up a window where you can also choose what file format to save your audio files and where to save your files. Click on Change Folder...” and choose where you want to save your album tracks.
Step 4: Save your files.
If you want archival quality audio files, consider saving in AIFF, Apple Lossless, or FLAC file formats. If you're just planning to listen to the files in iTunes or on one of your audio devices, then saving to a compressed format such as AAC (MP4) or MP3 will save storage space. Consider keeping copies of your audio files in AIFF on an external drive and converting them to AAC or MP3 for when you’re listening to music on your computer or audio device.
Audio quality and lossy versus lossless.
AIFF is lossless and uncompressed, which means that the audio is an exact copy of the original data. Lossy compression file formats such as AAC and MP3 compress audio data by discarding some of the least significant data in the file. The upside is that there is a virtually imperceptible loss of quality and compressed files take up much less storage than uncompressed AIFF files. However, every time you re-save a compressed file, the quality of the file will degrade (this degradation is called generation loss). Because of this degradation in quality, lossy compression file formats are not ideal for archiving or preserving original data, but their smaller compressed file size makes lossy compression file formats better for most audio devices.
Summary Checklist
- Have the proper equipment: Sound Studio 4. Your LPs. Mac computer with built-in mic, speakers, and line-in input. Amplified turntables with the proper cables.
- Connect turntables to your computer and configure preferences in Sound Studio. Set up a logical workflow before recording.
- After recording, insert Markers and name each marker. Use Edit > Split by Markers to enter album metadata.
- Save your files in AIFF if you're archiving originals, and save in a compressed format like MP3 or AAC if you're planning to listen to the files on an audio device.